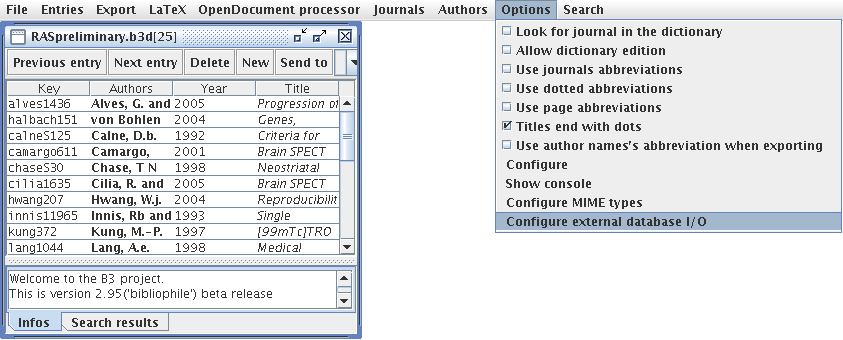
Figure 3.5: Configure the database I/O first.
Next: Using LaTeX, Previous: Exporting to OOo using a flat file, Up: Interacting with word processors
[This tutorial is contributed by Christian Wietholt.]
This tutorial is an attempt in helping people to export the reference database from B3 into OpenOffice.org with the help of a MySQL database. As there are many distributions and Operating systems available, on which you can run B3 and MySQL, I am not able to cover all the details. I assume that you installed MySQL successfully and you were able to log into the SQL manager with the commandline tool "mysql". Personally, I am using B3 and MySQL on Debian unstable, and I installed phpMyAdmin including a required web-server to administer the MySQL database. As this requires additional setup, I shall use the command line tool "mysql" that is distributed with the MySQL database.
First step in exporting your reference database to MySQL is to create a MySQL database. Log into your mySQL database manager using :
me@myDesktop:~\$ mysql --user me -p
Enter password: **********
Here I assume that you enabled password protection in your database manager, and already created a user with the required privileges to create, and alter a databases. Next you need to create a database with the following command :
mysql> create database myRefDB;

Query OK, 1 row affected (0.00 sec)
If you get the query OK response, everything should be fine, and you can exit your database manager by typing
exitNow your database is created and waiting for you to fill it with data from B3. You can start B3 and load up bibliography database that you wish to export.
First step you need to do is load the correct configuration file for you database I/O see fig:openIOconfig. This is essential for the bibliography database to work with OpenOffice.org. As the expected reference database format changes with different OpenOffice.org version, you need to keep this configuration updated. I am currently using OpenOffice 2.0.0.
A recent I/O configuration file can be found at http://kimura.univ-montp2.fr/~jdutheil/B3/Additional/OOo.dbc.xml.
Load the downloaded XML file and close the dialog box:
Now you can safely export your bibliography database to MySQL using the menu entry Export -> Export to SQL database.
A dialog will pop up to specify the MySQL database access information such as Driver, Domain, Port, Database, Username and Password. As a driver you need to choose MySQL, and set the other parameters appropriately. An example for accessing a database installed on you local machine is given in fig:exportSQL. Then push the "Connect" button.
B3 will ask you for a table name in which the database will be stored in. I typically choose "biblio". This is the standard table name in OpenOffice. I experienced some problems during my initial tests with a different table name, so I suggest to stick with "biblio". If you are adventurous enough, you can try using different names. If this table does not exist, B3 will create it for you. Just click "OK" and if you need to create the table, click "Yes", and your data is exported.
Now it is time to start OpenOffice. First you need to open the database application. OOo will ask you what you want to do. You choose the option "Connect to existing database" as shown in fig:OOoDBconnect and select of course "MySQL".
In the next wizard screen select the database driver you wish to use to connect to your MySQL database. Here you should select the JDBC driver. In the following wizard screen you need to input the connection details. In our case the appropriate configuration parameters are shown in the next figure:
In the next screen you need to input your user name and don't forget to tick the password check-box if you have password protected access to your database manager. In the following screen, you need to make sure that the radio button "Yes, register the database for me" is selected. You can also choose to "Open the database for editing" to make sure that everything works as planned. See figure fig:OOoDBconnectFinish for details. Click on "Finish" and save your OpenOffice database to a location of your choice. You can click on "tables" in OpenOffice Base to make sure that everything is working properly. OpenOffice should ask you for your password. In my case, accessing the table itself seems a little sluggish from OpenOffice Base, but the "Bibliography Database" dialog should work fine.
Now it is time to close OpenOffice Base and to open OpenOffice Writer. We choose the menu entry by going to Tools -> Bibliography Database.
Click on the tool bar entry "Data Source" and select the just registered database. The name of the saved OpenOffice database will be available in the list menu. OpenOffice will ask you for your password, and your bibliography should appear in the spreadsheet field of the "Bibliography Database" dialog. As a next step I'd suggest to make sure that the column arrangement is appropriately set. Just click on "Column Arrangement" in the tool bar of the "Bibliography Database" tool, and arrange the columns as shown in:
Now you can close the "Bibliography Database" dialog, and use the menu entry Insert -> Indexes and Tables -> Bibliography Entry to insert your citations at the cursor position. In the pop-up dialog you should be able to choose the reference entry in the bibliography database from a pull down menu. OpenOffice will place it at the cursor position after you pushed "Insert". If you want to create a bibliography table, select the menu entry Insert -> Indexes and Tables -> Indexes and Tables.
Here choose the "Type" "Bibliography" and format the table to your desires, or journal requirements.
Have fun with the great Open Source product.